http://www.pond5.com/stock-video-footage/1/green-screen-birds.html#2
Saturday, 10 May 2014
Monday, 21 October 2013


Tuesday, 15 October 2013
It's Roto Time!!
For my first shot, there is quite a fair bit of clean up to be done. As the CG Bow that is replacing the PVC pipe is smaller. The easier way out was to scale up the CG Bow, but there is a limit that I can scale the CG Bow, else the Bow will be out of proportion.


Node Graph for Shot 01
Sunday, 6 October 2013
Slow-mo Effect
For the second shot, the idea was to show the flight the arrow, in other words, a slow motion effect when the arrow is flying towards the target.
During the process of getting the effect, there are quite a few obstacles. After many attempts using the different nodes in NUKE (Retime & OFlow), there were a few issues. Mainly due to the control of the nodes.
Thus I tried using Time-Remapping in AE, it was able to achieve the desired effect with better control too.
Thus I tried using Time-Remapping in AE, it was able to achieve the desired effect with better control too.
Saturday, 5 October 2013
Composition Test
Did a quick test with a downloaded 3D bow, it seems like the bow has to be pretty big to cover up all the PVC pipe to reduce the amount of roto work. It seems to be totally off as everything is out of scale. It seems like roto-ing/ clean-up its kinda in-avoidable.

3D Bow from TF3DM
Wednesday, 2 October 2013
Integrating the Bow
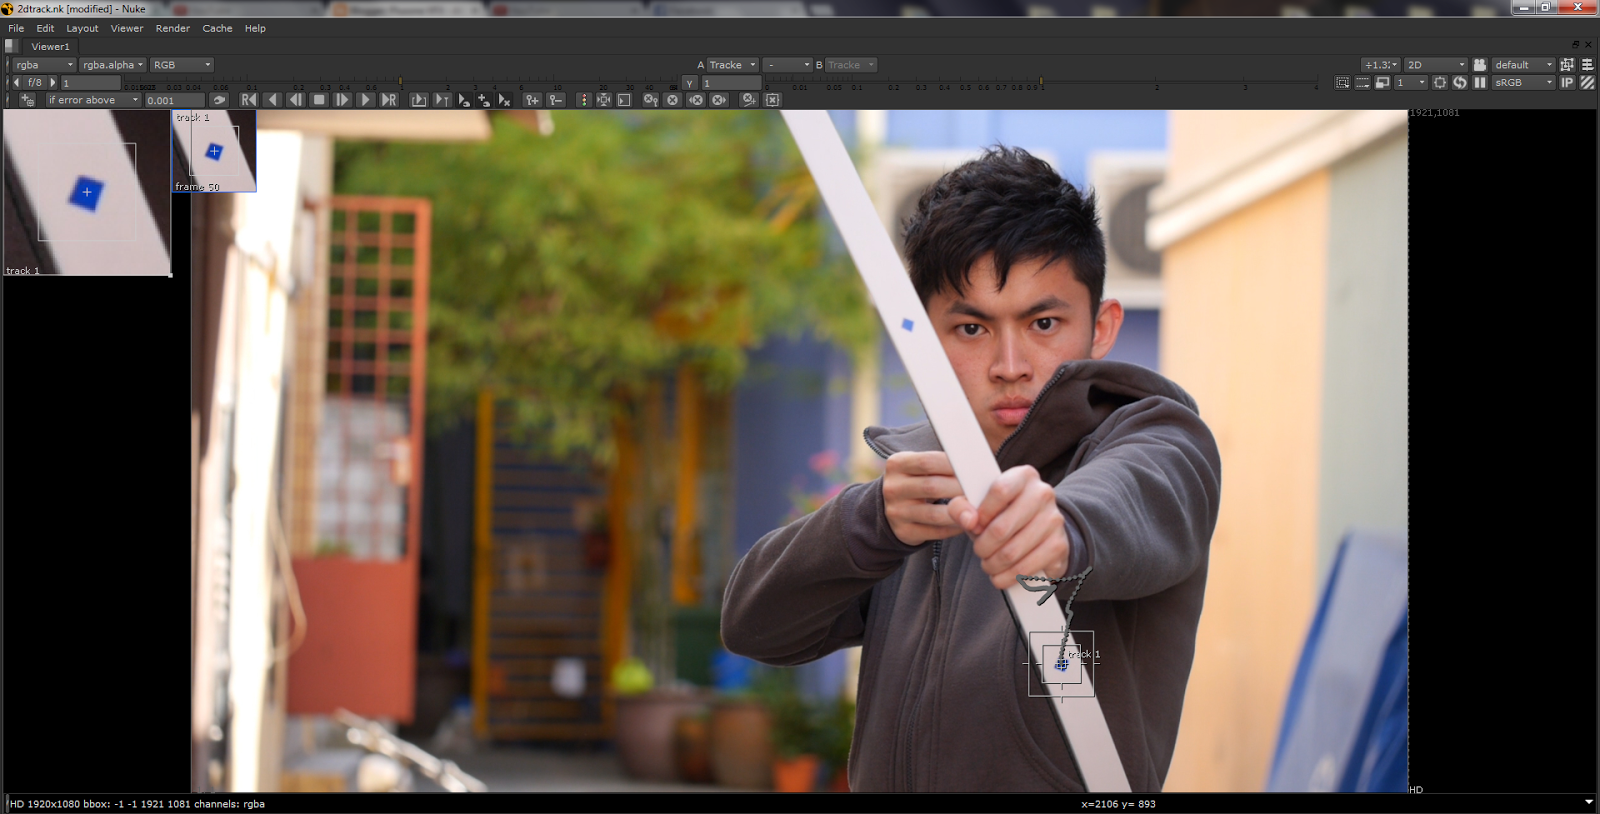
The plan that I have to integrate the bow into the shot was to make use of the trackers that I have pasted on the bow and to do a track on it so that I can bring it into Maya as a Locator, allowing me to parent and match the movement of the actual "fake" bow and CG Bow.
So first step, to do a quick track in NUKE.

http://tracksperanto.guerilla-di.org/
Tracker in Maya
So first step, to do a quick track in NUKE.
Next, to convert the tracker data into a 3D software such as Maya. I went to look for NUKE Gizmos to do the job but many failed to allow me to convert to FBX or any other files.
I tried to use a Camera Tracker in NUKE, but it fail to track my points in the shot too. So luckily, I came across this website, where I can convert tracker data from NUKE to Maya, or even into many other file format. I can say it really very useful, the link to the website is attached below. No download required, just upload your file and "BAM!" they will convert to a folder of different files for different software packages.
Tracker in Maya
Monday, 30 September 2013
Texturing/ Lighting
HDRI
Thanks to Zechari, we was able to capture our scene into a HDRI using the ladle we found in Chinatown! The HDRI helped a lot in achieving the correct lighting for this project.


Thanks to Zechari, we was able to capture our scene into a HDRI using the ladle we found in Chinatown! The HDRI helped a lot in achieving the correct lighting for this project.

Unwrapping HDRI in NUKE

After cleaning up
With photos taken from every 90deg angle, I was able to use the +90deg to use as a clean plate to clean up my HDRI.
Texturing
Mia_Material X was used for most of the surfaces of the 3D models, only diffused and bump maps were used.

Arrowhead

Bow

Nock
Look Development (Bow & Arrow)
After much research, there so many types of bow to chose from. I decided to use a simple recurve take-down bow.
Look Development (Bow)


The sight is added to make the bow look more interested and since I am using a CG bow, I can make it little bit more fancy. Thus also allowing me to add the carbon fiber texture and the skull logo onto the bow.
Look Development (Arrow Head)


Taking the advice from Daniel, the arrow head was made more "deadly". The first design look more like a stone crafted arrowhead thus I did some research of modern steel arrow head and took reference to its shape. The texture of the arrow was design to make it look more worn out.
Look Development (Arrow Fletch)


The initial plan was to just to use a plane for the arrow fletch, but it seems to have some issues when I am doing some test renders. For example the rounded edges seems to be have some white artifact (not sure what is that actually called) appearing. Since the fletch is going to take up quite a amount of the screen in my second shot. I decided to model the entire fletch out, having this model also allows me to bend it using the non-linear deformer.
Next step, to achieve the final look of the CG elements, the plan is to use material x (passes) for the final look.
Sunday, 29 September 2013
Reshoot - Shot 3
As the trackers I have tried to paste on Ngan Kai's neck didn't work, we have to go back for a re-shoot for Shot 3. Using the same logic/ technique as the first shot, I used a short PVC piping and pasted trackers that will allow me to track the movement of the neck thus allowing me to place the arrow into the shot.


Thanks again to Ngan Kai, Zechari and Jeng Yih for helping out with the reshoot.
Wednesday, 25 September 2013
Tracking/ Stabilizing and Matchmoving
Time to proceed with some work on my footage. The plan was to track and stabilize the footage I have selected for the second shot in NUKE. But it didn't manage to give me a very good result, as I got 3/4 of my footage cropped off after the stabilizing.
Footage before stabilize

Footage after stabilize


Footage before stabilize
Footage after stabilize
So after many attempts to get the best out of the footage, I decided to give AE's Warp Stabilizer a try. BAM! It worked well.
Camera Tracking in NUKE
It turns out pretty well, as the cube that I added seems to be sticking to the floor.
Tuesday, 24 September 2013
The Shoot
Taking the suggestion for my classmates, the shoot for my project will be done in Haji Lane, as the "requirement" for shoot was to have a straight alley and Haji Lane would nicely fit into the picture.
Okay! The plan for the shoot! What I will be filming will be...
Shot 1 - The character (myself) will draw the arrow and aims at the camera.
Shot 2 - The flight path of the arrow
Shot 3 - The other character (thanks Ngan Kai for being the other actor in the shot) to be shot by a arrow and turn towards the camera.
Location

Shot 2


Shot 1
Shot 2
Shot 3 is kinda fail. Might require a require a reshoot after planning what should I exactly do for the final shot and the way to film it. Nonetheless, we did quite some prep for the 3rd shot.

Thanks Zechari, Ngan Kai and JengYih for helping out with the shoot!!
Saturday, 21 September 2013
Friday, 20 September 2013
Previz!
(Free Character Rig from Creative Crash)
Some changes have been made to the shot, taking more reference from one of the research seen below in the earlier post. The setting of shots 1 and 2 have been changed to an alley so that a smoother camera tracking can be done as compared to having the characters standing on a grass patch and background of trees.
The final shot will be showing a character being shot at his neck and the plan is to match move the arrow that was shot through his neck during the reveal (when the character turns to face the camera)
Thursday, 19 September 2013
DIY Bow - PVC Pipe
A quick test with my DIY Bow made from Cabling Cases I bought from the DIY store. The first bow shown below was the first prototype and it seems a bit too huge. Need to trim away the ends to


The bow was made by drilling holes to the inner section of the casing and securing a string at the both ends.
Monday, 16 September 2013
Test Animation - Bow Bending
As I will using a CG Bow, I find that it is important that I do some testing for the animation and see if will be too time consuming to do a realistic bending animation. Taking some advise from a classmate, I went on to take a look at the FFD Bend function in Maya.
*Boom* I was able to achieve quite a decent animation by tweaking only one control.
The next step is to use markers that are placed on the PVC bow that I have made as references and trackers on how a bow will bend.
Yes, I made a D.I.Y bow using PVC piping and some Fishing Spool, which turns out quite decent. :]. I will post up more information about the D.I.Y bow together with the test shot next.
Yes, I made a D.I.Y bow using PVC piping and some Fishing Spool, which turns out quite decent. :]. I will post up more information about the D.I.Y bow together with the test shot next.
Sunday, 15 September 2013
Prop Hunting
After deciding on the idea, the journey of hunting a suitable prop begins...


All the Toy Bows that are sold in the shops I have went were too small, as they are meant for small kids (3-7 years old). Alternatively, I could loan an actual archery bow to use it as the prop for the shot. The only risk that I foresee for that is that I will damage the bow and a proper archery bow can cost from about $400++
Thus I was considering to CG the bow that the character will be using into the shot. Foreseeing that I might have some difficulties making the CG bow look realistic in terms of the lighting and looks also the bending of the CG bow might be another issue.
Saturday, 14 September 2013
Idea Selected
After much considerations, I have decided to go ahead with the "Arrow Shot" idea. So to make it more "cool", I have changed how the shots should be framed to make the whole short clip more interesting. Finally I will be working on a simple previz to finalize the whole look and feel of the project before I start with any actual filming.
Thursday, 12 September 2013
Idea Idea Ideas
Here is the part where I have decide on which idea should I pick.. After the short consultation with the lecturer yesterday, my more favorable preferred idea is kinda simple. Maybe I should reconsider my idea or pick one from one of the others I have in my mind?
Idea 1 - VFX Arrow Flight "The more favorable idea"
Inspiration: This idea is inspired from many movies such as Lord of the Ring (Legolas), War of Arrows, but mainly due to my interest in Archery.
The main intention of this idea is to pick a simple idea but to make the VFX look realistic and believable.


Approach: For the shoot, I intent to load a modern day archery bow for the character to hold while the arrow will be a CG element in the shot.
As for the shot that character was shot, trackers will be placed on the point of impact for the arrow or the alternatives will be to have the character to hold a green stick that will be replaced by a CG arrow.
After having looking at more references, I might be changing how the shot will be filmed to make it look more interesting, instead of presenting the whole character in front of the screen to shoot an arrow towards the screen, it can be like the 4th reference video above where the arrow is flying out from the archer point of view.
Idea 2 - Heat Marking
Inspiration: This idea was inspired by a scene in Spartacus: Blood and Sand (Season 1: Episode 2) where the Protagonist "earns" his place as an arena warrior and Mark of Brotherhood.


Idea 1 - VFX Arrow Flight "The more favorable idea"
Inspiration: This idea is inspired from many movies such as Lord of the Ring (Legolas), War of Arrows, but mainly due to my interest in Archery.
The main intention of this idea is to pick a simple idea but to make the VFX look realistic and believable.

(Storyboard)


As for the shot that character was shot, trackers will be placed on the point of impact for the arrow or the alternatives will be to have the character to hold a green stick that will be replaced by a CG arrow.
After having looking at more references, I might be changing how the shot will be filmed to make it look more interesting, instead of presenting the whole character in front of the screen to shoot an arrow towards the screen, it can be like the 4th reference video above where the arrow is flying out from the archer point of view.
Idea 2 - Heat Marking
Inspiration: This idea was inspired by a scene in Spartacus: Blood and Sand (Season 1: Episode 2) where the Protagonist "earns" his place as an arena warrior and Mark of Brotherhood.
Spartacus (Blood and Sand - Episode 1)
Approach: For this idea, I intend to shoot the scene with the character holding stick (Shot 1) as a still shot and have the character to hold a green stick, as the heated stamp-rod will be CG into the shot. For the next shot, the camera will move backward after the mark is stamp to show the character in pain. (NEW idea struck while typing this)
To add on to the shot, the stamp could be a demonic imprint that turns anyone that have the marking into a "demon". Thus the shot can continue by showing the character's eyes changing into a full white eyeball (without the iris)
Subscribe to:
Comments (Atom)